
Creating a ZIP Archive
Often it's useful to compress a file (or group of files) into a ZIP formatted archive. This is helpful when trying to reduce file size for electronic delivery, or when you want to package a lot of files neatly into one container. Another great reason to use .zip archives is to simplify sharing files with Windows users.
One other benefit of archiving items is to avoid email delivery problems. Often file attachments will get flagged by mail servers as junk, even when they are not. If you create a ZIP archive before you attach files to an email, you will greatly simplify delivery.
To create a ZIP archive, follow these steps: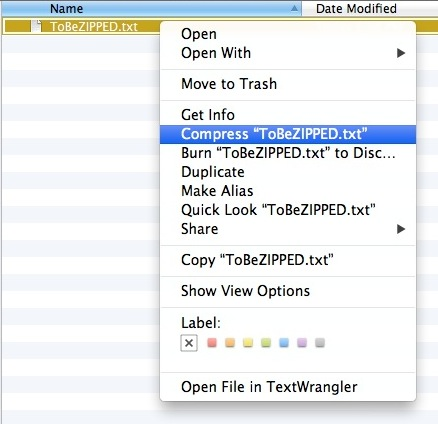 1- Locate the file, group of files, or folder containing the documents you want archived.
2- Select all of the items you want contained in the ZIP archive (this can be a single file, folder or group of items).
3- Right click (or hold the Control key while clicking) on any one file you just selected.
4- From the pop-up menu, choose "Compress...(file name)..." On older operating systems this may say "Archive...".
5- If you chose one file or folder, a new compressed archive file will be created with the exact same name, ending in .zip. Or, if you had multiple items selected, it will be called "Archive.zip". The archive file will be located in the same location as the originals.
6- You can rename the archive something appropriate, just be sure NOT to remove the .zip from the end of the file.
 Post a Comment
Reader Comments